Friday, December 31, 2010

Java Pyramids


Java Pyramids


Introduction

This is a short, classic pyramids of asterisks example which teaches some cool uses of for loops, and hopefully helps you to discover the potential of for loops. We're going to make a program that displays this:

*
**
***
****
*****
******
*******
********
*********

Creating the Program


First thing you're going to want to do is create a new Java class. You may call yours whatever you like, or you can use the same class name as in this example. Make sure that there is the standard main method inside of your new class.

Because this is a looping example, we're going to need a loop. More specifically, we're going to be using a for loop.

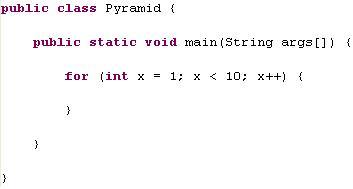
Notice how the pyramid has nine rows? That's exactly what we want our for loop to accomplish for us. So make a for loop that starts at 1 and goes all the way to 9. This is what it should look like:

For loop 1 to 9


Look at how my second condition is x <>Now all we have to do is print out the asterisks. But wait a minute, we have to print out a different number of asterisks each time! How will we know how many asterisks to print out?

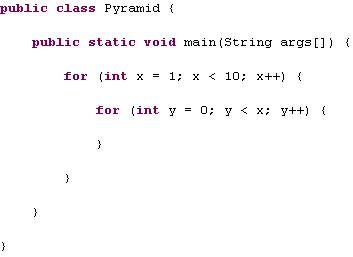
The answer lies again in looping. We have a loop that loops through the rows, but perhaps we also need a loop that loops through the number of asterisks. Notice how it starts with one star and goes all the way to 9? Well our for loop already almost takes care of this for us. Now we just need a loop that prints out one asterisk at a time, all the way up to whatever number we're at with our current for loop. Take a look at this:

inner loop to x


First of all, I'm using a different variable in the inner for loop, because x is already being used for the outer for loop. Second of all, Notice the 2nd condition. It is saying to loop until you reach the value of x. This will ensure that we print as many asterisks as the row number that we are on. Row 1 prints out 1 star, row 2 prints out 2 stars, etc.

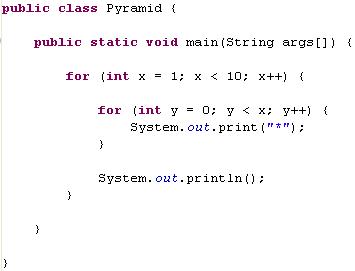
Now we just need to add all the print statements we need to get it to display:

pyramid


Do you see how those print statements work? I'm not using println for the inner for loop because I want the asterisks to be printed out side by side. I also have an empty println under the inner for loop so that a new row is begun once a row of asterisks is printed out.

Backwards Pyramid


How can we modify the code we've written to create a backwards pyramid? You know, one that starts with 9 stars and then ends with 1?

We can actually do this by changing just one line of code.

Remember that the way stars are printed out is determined by the for loops we created. If we change the way those loops work, then we can print out these asterisks backwards. How do we do that?

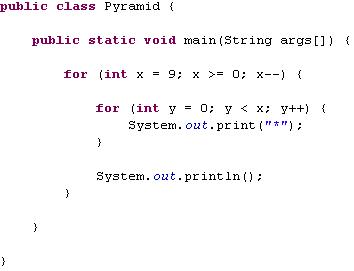
First let's look at the outer for loop. It counts from 1 to 9. Wouldn't it make sense to just make it count from 9 to 1? Here's how you would do this:

Backwards for loop


Try running the program. The asterisks should be backwards now! You didn't even have to change the inner for loop. Why? Because the inner for loop prints out as many asterisks as what x is equal to. So since we flipped the way x works, we have flipped the way the asterisks are printed out.

The reason we can make the for loop go backwards lies in the 3rd condition, the counting condition. We are telling the for loop to subtract one from x each time it loops. We have replaced the two pluses with two minus signs.

So there you have it, a mini-example on nesting for loops together as well as making for loops count backwards. Feel free to experiment with your own asterisk combinations!


other program
----------------
1
12
123
12
1

class Pyramid1
{
public static void main(String args[])
{
int i,j;
for(i=1;i< =3;i++)
{
for(j=1;j< =i;j++)
System.out.print(" "+j);
System.out.print("\n");
}
for(i=2;i> =1;i--)
{
for(j=1;j< =i;j++)
System.out.print(" "+j);
System.out.print("\n");
}
}
}
----------------------------


Friday, December 24, 2010

Struts Life Cycle

Life Cycle Of Struts Or Flow Of Struts:

When the Framework is loaded, it first loaded the Web.xml
file. Then from the Servlet tag of Web.xml, it identifies
the ActionServlet(or the Struts-Cofig.xml). Then from
welcome-file tag of web.xml, it identifies the
first JSP page and runs it. Then when the request comes
through that jsp, from acion-mappings tag of Struts-
Cofig.xml it identifies the request, through path tag
(request name) and input tag (jsp name), through name tag
it identifies which bean is needed to access the data and
through type tag it identifies which Action should be
invoked. Then through the forward tag it identifies to
which jsp it has to forward the response.

load-on-startup element in web.xml


This tips explains the few points on how to use the load-on-startup element on the web.xml file. When erver is starting, it is possible to tell the container to load a servlet on the startup. You can load any number of servlets on the startup. Normally this is done for any initialization purpose. Look into the following example:

&ltservlet&gt
&ltservlet-name&gtTestServlet&lt/servlet-name&gt
&ltservlet-class&gtTestServlet&lt/servlet-class&gt
&ltload-on-startup&gt1&lt/load-on-startup&gt
&lt/servlet&gt


The above example tells the container that the servlet will be loaded at first.The sub-element indicates the order in which each servlet should be loaded. Lower positive values are loaded first. If the value is negative or unspecified, then the container can load the servlet at anytime during startup.

job sites

http://www.chetanasforum.com/index.php?showforum=4


http://www.chetanasforum.com/index.php?act=announce&f=4&id=4

Wednesday, December 8, 2010

Struts Tutorials

Struts MVC Architecture

The model contains the business logic and interact with the persistance storage to store, retrive and manipulate data.

The view is responsible for dispalying the results back to the user. In Struts the view layer is implemented using JSP.

The controller handles all the request from the user and selects the appropriate view to return. In Sruts the controller's job is done by the ActionServlet.


The following events happen when the Client browser issues an HTTP request.

* The ActionServlet receives the request.
* The struts-config.xml file contains the details regarding the Actions, ActionForms, ActionMappings and ActionForwards.
* During the startup the ActionServelet reads the struts-config.xml file and creates a database of configuration objects. Later while processing the request the ActionServlet makes decision by refering to this object.

When the ActionServlet receives the request it does the following tasks.

* Bundles all the request values into a JavaBean class which extends Struts ActionForm class.
* Decides which action class to invoke to process the request.
* Validate the data entered by the user.
* The action class process the request with the help of the model component. The model interacts with the database and process the request.
* After completing the request processing the Action class returns an ActionForward to the controller.
* Based on the ActionForward the controller will invoke the appropriate view.
* The HTTP response is rendered back to the user by the view component.


-------------------------------------------------------------------------------


Hello World Example in Eclipse

In this tutorial you will learn how to create a Struts hello world application in eclipse. First create a new project, go to File->New and select DynamicWebProject.


http://www.vaannila.com/struts/struts-tutorial/struts-tutorial-using-eclipse-1.html

http://viralpatel.net/blogs/2008/12/tutorial-creating-struts-application-in-eclipse.html


other best java tutorials


http://www.tutorialspoint.com/index.htm

JSTL Tutorials

http://www.java2s.com/Tutorial/Java/0380__JSTL/Catalog0380__JSTL.htm

http://www.javamex.com/tutorials/java/objects.shtml


Ant Tutorials
1. http://www.roseindia.net/jboss/10_minutes_guide_to_ant.shtml
2. http://www.exubero.com/ant/antintro-s5.html

web services with IDE
1. http://eclipse-axis.blogspot.com/

Web services with out IDE
1. http://www.roseindia.net/webservices/axis2/apache-axis2-hello-world.shtml
2. http://lkamal.blogspot.com/2008/07/web-service-axis-tutorial-client-server.html
3. http://anupjani.wordpress.com/2009/03/27/java-web-service-example/

Web Services with JBoss using Axis
1. http://www.mastertheboss.com/web-interfaces/159-using-axis-web-services-with-jboss.html

Web Services with JBoss using Axis
1. http://jaitechwriteups.blogspot.com/2006/12/simple-webservice-on-jboss-using-axis.html
2. http://jaitechwriteups.blogspot.com/2007/04/webservice-client-using-dynamic-proxy.html
3. http://techno-cratic.blogspot.com/2010/01/creating-jbossws-web-services-with.html

JSF
1. http://www.roseindia.net/jsf/index.shtml

Struts
1. http://www.roseindia.net/struts/struts2/index.shtml
2. http://www.vaannila.com/struts/struts-tutorial/struts-tutorial.html

Job Sites

http://anilbabucareeropenings.blogspot.com/

Web Services with Apache Axis 1.4 Tutorial: server and client sides

GOPI GOLLA

Web services are a handy method of integrating independent systems. Apache Axis is one of the best free tools available for implementing and deploying web services, and also for implementing the web service clients.

In this article we will create a simple, but complete web service and a client for this service step-by-step. Article will be explanatory as much as possible to succeed you in implementing it yourself alone after completing this tutorial.

Prerequisites

* Must be familiar with Java
* Familiar with basics on a web server like Tomcat
* Some knowledge in configuring Axis will be an added advantage

System Configuration Requirements
We will be discussing the configuration in brief as our scope is mainly on web services. (If Axis already configured, jump to implementation). If you find any issues on the configuration part, you can refer to Apache Axis site for troubleshooting. (But if you can not solve it yourself do not worry, post the issue under the comments section in this article, and we’ll get back to you).

JDK installation
These examples have been tested on a machine with JDK 1.6 version.

Web Server
You must have a web server
installed; and we will be using Tomcat (5.5 version) web server. If you are not having one, better download Tomcat here{link} and install it yourself (it is quite easy to install Tomcat). Now your CATALINA_HOME environment variable should point to the Tomcat installation directory.

Apache Axis 1.4
Download Apache Axis 1.4 here{link}. Extract the downloaded file and you’ll find a folder named “axis” inside webapps folder.
%Axis_1.4_dir%\webapps\axis
Copy this “axis” folder into your web server’s webapps folder.
%CATALINA_HOME%\webapps

CLASS PATH
Now you must add following libraries into your CLASSPATH environment variable. All of these are available under %Axis_1.4_dir%\lib folder.

* activation.jar
* mail.jar
* axis.jar
* commons-discovery.jar
* commons-logging.jar
* jaxrpc.jar
* log4j-1.2.8.jar
* saaj.jar
* wsdl4j.jar

That’s all for configuring Axis 1.4 on your system, quite easy isn’t it? Let’s move on to the implementation part.

Implementation - web service and client
The implementation will consist of two parts. First we will implement web service part; a Calculator will be exposed as a web service. Next a client to use this Calculator web service will be implemented. (Client part starts from here).

Calculator Web Service
Implementing the web service consists of 7 steps. We will be explaining each step in detail.

1. Functionality provider
2. Web service’s interface
3. Java2WSDL - Generate WSDL file
4. WSDL2Java - Generate server side and client side classes for web service
5. Bind Web service with Functionality provider
6. Bundle required classes
7. Register web service with axis


Project structure
Before starting coding, we'll have a look at the project structure. We are using a separate folder for the project, called "WS-Sample". We will be creating source (.java) files under "WS-Sample\src" folder and storing generated class (.class) files under a "WS-Sample\classes" folder.


1. Functionality provider
First we need to write class with calculator functionality before exposing it as a web service. We have implemented it as a pretty complex high end calculator class, named SimpleCalculator and it's listed below. (It is just a pretty simple class with three methods). This class has no information related to a web service and has been written as a simple independent class. So in the time this class was written, no one has thought of any web service stuff. But we will expose this class as a web service. (Yes, what you guessed is correct. Later you can expose your existing Java classes as web services.)

package org.kamal.wssample;

public class SimpleCalculator {

public int add(int a, int b) {
return a + b;
}
public int subtract(int a, int b) {
return a - b;
}
public int multiply(int a, int b) {
return a * b;
}
}


We'll compile above class using following command so that the generated .class file will reside in a folder named "classes" while preserving the package structure.

WS-Sample\src> javac -d ..\classes
org\kamal\wssample\SimpleCalculator.java


2. Web service’s interface
Now we should write an interface that defines the services that will be provided by our web service. We will expose only two methods through our service; add() and subtract() methods (although we can expose any number of services within one web service). We did choose only two methods to emphasize the fact that we can control which methods we expose. And we will write this class in a separate package; org.kamal.wssample.ws.

package org.kamal.wssample.ws;

public interface Calculator {
int add (int x, int y);
int subtract(int x, int y);
}


And compile using following command.

WS-Sample\src> javac -d ..\classes
org\kamal\wssample\ws\Calculator.java


3. Java2WSDL - Generate WSDL file

Axis has a tool called Java2WSDL, which generates a WSDL file for a web service using a Java class. We should use the Calculator interface and generate WSDL file as follows. Java2WSDL file requires the Calculator.class file (not Calculator.java) for the operation. Also we will provide the following information.

* o – name for WSDL file -> calculator.wsdl
* n – target namespace -> urn:org.kamal.calculator
* l – url of web service -> http://localhost:8080/axis/services/calculator

WS-Sample\classes> java org.apache.axis.wsdl.Java2WSDL
-o ..\calculator.wsdl
-n urn:org.kamal.calculator
-l http://localhost:8080/axis/services/calculator
org.kamal.wssample.ws.Calculator


This command will generate a file named calculator.wsdl inside your project folder.

4. WSDL2Java - Generate server side and client side classes for web service
Axis has another tool named WSDL2Java, which can generate server side and client side Java classes using a WSDL file. These classes are needed for deploying the web service and for accessing the service by a Java client. This tool must be provided with WSDL file that we generated in the previous step. It needs the following information as well.

* o – output folder -> src
* p – package for generated classes -> org.kamal.wssample.ws.generated
* s – generate server side classes as well

WS-Sample> java org.apache.axis.wsdl.WSDL2Java
-o src
-p org.kamal.wssample.ws.generated
-s
calculator.wsdl


Generated java classes will be saved in org.kamal.wssample.ws.generated package. This tool will generate five Java classes in this case with two .wsdd files as listed below.

* Calculator.java
* CalculatorService.java
* CalculatorServiceLocator.java
* CalculatorSoapBindingImpl.java
* CalculatorSoapBindingStub.java
* deploy.wsdd
* undeploy.wsdd

Now we should compile those generated classes using the following command.

WS-Sample\src> javac –d ..\classes
org\kamal\wssample\ws\generated\*.java


5. Bind Web service with Functionality provider
As you may have noted; even though we wrote org.kamal.wssample.SimpleCalculator class at the start, we have not used it so far. Now we are going to bind it to the web service.

There is a class named CalculatorSoapBindingImpl inside org.kamal.wssample.ws.generated package. This is the class used to bind our existing SimpleCalculator class to the web service calls. In CalculatorSoapBindingImpl class, there are two methods; add() and subtract(). In this class, we can use the SimpleCalculator to call the actual methods as follows.

package org.kamal.wssample.ws.generated;

import org.kamal.wssample.SimpleCalculator;

public class CalculatorSoapBindingImpl
implements org.kamal.wssample.ws.generated.Calculator{

private SimpleCalculator calc = new SimpleCalculator();

public int add(int a, int b) throws java.rmi.RemoteException {
return calc.add(a, b);
}

public int subtract(int from, int x) throws java.rmi.RemoteException {
return calc.subtract(from, x);
}
}


Just analyze the above class, all method calls are delegated to the actual implementation class SimpleCalculator inside this binding class.

6. Bundle required classes
Now we will create a jar file with all these classes, so that we can use it for deploying our web service. Use the jar command as follows.

WS-Sample\classes> jar cvf ..\calculatorServerSide.jar
org\kamal\wssample\*.class
org\kamal\wssample\ws\*.class
org\kamal\wssample\ws\generated\*.class


Now copy this jar file into %CATALINA_HOME%\webapps\axis\WEB-INF\lib folder.

WS-Sample> copy calculatorServerSide.jar
"%CATALINA_HOME%\webapps\axis\WEB-INF\lib"


We will create another jar file to use in the client side. For the client side we only need the classes that were generated by the WSDL2java tool (which are located inside org\kamal\wssample\ws\generated package), except the CalculatorSoapBindingImpl class.

WS-Sample\classes> jar cvf ..\calculatorClientSide.jar
org\kamal\wssample\ws\generated\CalculatorSoapBindingStub.class
org\kamal\wssample\ws\generated\CalculatorServiceLocator.class
org\kamal\wssample\ws\generated\CalculatorService.class
org\kamal\wssample\ws\generated\Calculator.class


7. Register web service with axis
Axis comes with a tool for registering web services with Axis; it is called AdminClient. Look into org\kamal\wssample\ws\generated folder and you will find two WSDD (web service deployment descriptor) files; deploy.wsdd and undeploy.wsdd. These files were generated by WSDL2Java tool and as used in deploying/undeploying a web service.

Note: (Tomcat) Server must be started before executing the following command.

WS-Sample\src> java org.apache.axis.client.AdminClient
org\kamal\wssample\ws\generated\deploy.wsdd


This command will deploy the web service into axis. Now restart (Tomcat) server.

To verify our web service is deployed correctly; try following url from your browser
.
http://localhost:8080/axis/services/calculator?wsdl
(change the port 8080 in url to match the port on your machine)

This will show up a complete wsdl file, and it is the complete definition of the web service that we have deployed.

Now everything on web service (server side) is completed and our web service is successfully deployed.

Web Service client
Now it’s time for us to write a client to access this web service and use provided services. For this we need the calculatorClientSide.jar file that we created in an earlier step.

For the client side we will create a new project folder named “WS-Client” with sub folders named src, classes and lib. Copy the generated calculatorClientSide.jar file into the "WS-Client\lib" folder.


We will create the client as follows. Since our web service exposed two methods, add() and subtract(); client class will use the service and call those add() and subtract() methods.

package org.kamal.wsclient;

import org.kamal.wssample.ws.generated.Calculator;
import org.kamal.wssample.ws.generated.CalculatorService;
import org.kamal.wssample.ws.generated.CalculatorServiceLocator;

public class CalcClient {

public static void main(String[] args) throws Exception {
CalculatorService service = new CalculatorServiceLocator();
Calculator calc = service.getcalculator();

System.out.println("15 + 6 = " + calc.add(15, 6));
System.out.println("15 - 6 = " + calc.subtract(15, 6));
}
}


The above class has not used even a single class that we wrote for Calculator implementation, only a few classes that WSDL2Java tool generated. We have not exposed the server side classes, but just provided a way to get the service from those classes.

Compile the class with following command.

WS-Sample-Client\src> javac
-classpath %CLASSPATH%;..\lib\calculatorClientSide.jar
-d ..\classes
org\kamal\wsclient\CalcClient.java


Now we can run our web service client using following command.

WS-Sample-Client\classes> java
-cp %CLASSPATH%;.;..\lib\calculatorClientSide.jar
org.kamal.wsclient.CalcClient


You would see the following as the result.

15 + 6 = 21
15 – 6 = 9


Our web service client, CalcClient has accessed the web service and received the results from the operations done by SimpleCalculator class (which is running on server side).

As you can see, generating the client side is much easier than the server side.

GOPIGOLLA

Friday, December 3, 2010

Web Services For Beginners

GOPI GOLLA


Introduction
Recently I was reading through SOA and I wanted to develop few services using Axis. Since I was already comfortable with eclipse as j2ee development IDE (I use eclipse 3.4 – Ganymede for development purposes). When I started with axis, I wanted to use eclipse for development of web-services too. I struggled couple of hours googling to find best way to write, debug, deploy and distribute web services.


I googled and finally I would an acceptable way to do development and debug. These are information I put together from my own experience and various sources from internet.

Before starting, I want to mention my development environment.


Development environment
Java – J2ee SDK 1.4.
Jre 1.5.
Eclipse 3.4 Ganymede.
Axis2 - 1.4


Create Web Service
For better clarity, I will take you through one service creation and one client creation using eclipse. For simplicity I will create a simple calculator service with 4 simple service functions.


· add
· divide
· substract
· multiply


Step 1: Create a dynamic web project.
File -> New -> Project ->


Press Finish and you have a new dynamic web project.


Step 2: Create a simple Calculator class.


package org.bpt.Services;

/**
*
* @author GOPI GOLLA
*
* Axis Service Sample.
*
*
*/

public class Calculator {

public double add(double arg1, double arg2){
return arg1 + arg2;
}

public double substract(double arg1, double arg2){
return arg1 - arg2;
}

public double multiply(double arg1, double arg2){
return arg1 * arg2;
}

public double divide(double arg1, double arg2){
if(arg2 != 0)
return arg1 / arg2;
else return -1;
}
}


Step 3: Create an axis service from this class.


Right click Calculator.java
New -> Other -> Web Service


Next


Click on the link and select Axis 2.


Click OK and click Next in Web service Dialog.


Now click on Start Server and wait for few seconds.
Press Next


Finish. You have created a new axis service, deployed it and started the server now.

Check Services


To check the deployed service, check the following URL in a browser.
http://localhost:8080/CalculatorService/services/listServices


You see the following screen with the newly created service listed.


To check whether service is working properly, check the following URLs


To see the service definition, click the following link.
http://localhost:8080/CalculatorService/services/Calculator?wsdl


Add Service:

http://localhost:8080/CalculatorService/services/Calculator/add?arg1=12&arg2=13


You see an xml file containing result as below. You can change the arguments to see the service working.


Substract Service

http://localhost:8080/CalculatorService/services/Calculator/substract?arg1=12&arg2=13


You see an xml file containing result as below. You can change the arguments to see the service working.


Multiply Service

http://localhost:8080/CalculatorService/services/Calculator/multiply?arg1=12&arg2=13

You see an xml file containing result as below. You can change the arguments to see the service working.


Divide Service

http://localhost:8080/CalculatorService/services/Calculator/divide?arg1=12&arg2=13


You see an xml file containing result as below. You can change the arguments to see the service working.


Cool and easy ..isn’t it?


Creating a Java Client for the web Service
Now we will create a Java client which used the services we created now. There are many ways to create clients and I will explain one of them.

File -> New -> Project -> Dynamic Web project


Click Finish and now you have a dynamic web project “CalculatorServiceClient”.
Now select on your Calculator.java file in CalculatorService project.

File -> New -> Other -> Web Service Client


Next


Set it to Axis 2.


Add service definition URL - http://localhost:8080/CalculatorService/services/Calculator?wsdl


Select Calculator client project


Next


Keep the default setting s and press finish. You see that new classes are created for the client.


Now we will write a simple console application which uses these generated classes to access the services – CalculatorServiceClient.java.


package org.bpt.services;

import org.apache.axis2.AxisFault;

public class CalculatorServiceClient {

public static void main(String[] args) {
try {
CalculatorStub stub = new CalculatorStub();
double val = add(stub, 12,13);
System.out.println("Got response from add service. result = " +val);
} catch (AxisFault e) {
e.printStackTrace();
}

}

/* fire and forget */
public static double add(CalculatorStub stub, double arg1, double arg2) {
try {
CalculatorStub.Add req = new CalculatorStub.Add();
req.setArg1(arg1);
req.setArg2(arg2);
CalculatorStub.AddResponse res = stub.add(req);

return res.get_return();
} catch (Exception e) {
e.printStackTrace();
System.err.println("\n\n\n");
}
return -1;
}


}


Run the application and you see the result in the console. Congratulations. You have created your first web service in eclipse. You are now ready to fly to the heights. All the best for a great fly.

Have TO UpDate

Thursday, September 16, 2010

Disable CD Autorun

1) Click Start, Run and enter GPEDIT.MSC

2) Go to Computer Configuration, Administrative Templates, System.

3) Locate the entry for Turn autoplay off and modify it as you desire.

Want to show a logon message before entering into the main Screen?

* Go to Start =>run
* Type regedit and hit Enter key
* Go to HKEY_LOCAL_MACHINE\SOFTWARE\ Microsoft\ Windows\ CurrentVersion\ Winlogon
* create a new string value named"LegalNoticeCaption"
* Enter title for the window which will be displayed in the Title Bar of the window
* create a new string value named"LegalNoticeText"
* Enter the text for your message box that will appear even before the Logon window

Have fun with ur friends!!!

Monday, September 6, 2010

CREATION AND REMOVAL OF A TROJAN HORSE FOR EMAIL BOMBING AND DATA STEALING

GAME APPLICATION (TROJAN)

STEP: 1 The project is designing a Trojan horse for email bombing the contacts in Microsoft Outlook Express.

STEP: 2 The front end application of the Trojan horse is an attractive game application which is downloaded by the user.

STEP: 3 This game application is a combined application consisting of the Trojan horse.

STEP: 4 This Trojan horse is a hidden application which is a java program which reads the contacts present in the Microsoft Outlook Express.

STEP: 5 User is required to RUN only the GAME APPLICATION in this case CHOPPER.EXE.

STEP: 6 The user should have the Microsoft Outlook Express installed in it with few contacts also present in it.

STEP: 7 These contacts are the inputs for the Trojan process.

STEP: 8 Even if the user closes the GAME application the Trojan continues to execute until it finishes sending Email bomb to all the contacts.

PHISHING ATTACK

STEP: 1 To launch a phishing attack on a local area network we need to configure the HOST file present on the client system.

STEP: 2 The following ip addresses are to be configured on the HOST file.

Duplicate Server-169.254.12.237

Original Server-169.254.201.188

Client-169.254.143.153

STEP: 3 The user has to click on the link which he receives from the Email Bomb content.

STEP: 4 When the user clicks on the link he will be redirected to the original server where the sign-up link for the duplicate server exists.

STEP: 5 When user clicks on the sign-up link he will be redirected to the duplicate server where he is asked to enter the details.

STEP: 6 The user has to enter his name, password and his nickname.

STEP: 7 These details are stolen and stored on the duplicate server. Also the user will be redirected back to original server.

REMOVAL TOOL

INSTALLING THE WINDOWS SUPPORT TOOLS

STEP: 1 Install the windows support tool which is the update from Microsoft Corporation.

WindowsXP-KB838079-SupportTools-ENU is the update

STEP: 2 To install this update in windows 7 we need to make this program compatible with windows vista by changing its compatibility. We have to run this program as Administrator.

STEP: 3 Install this program completely to get the IPSECCMD.EXE command line support tool

STEP: 4 We require polstore.dll to run the support tool place the polstore.dll in both the system32 and support tools in program files.

TO KILL THE PROCESS

STEP: 1 To kill a particular process run the processkill.java which calls the processkilling.bat which kills the Trojan process.

STEP: 2 To directly kill the process we can run the processkilling.bat

TO BLOCK ALL THE TCP PORTS

STEP:1 To block all the TCP ports we can run tcpblock.java which calls the tcpblocking.bat

Which blocks all the tcp ports.

STEP: 2 To directly block all the ports we can directly run the tcpblocking.bat.

TO UNBLOCK ALL THE TCP PORTS

STEP: 1 To unblock all the TCP ports we can run tcpublock.java which calls the tcpublock.bat

Which unblocks all the tcp ports.

STEP: 2 To directly unblock all the ports we can directly run the tcpublock.bat

Search This Blog